Chapter 2 takes a closer look at the various methods for wireless captures, helping you understand when and where to capture, and what approach works best. Essentially, it’s the how, when, and where of Wi-Fi capturing.
To capture 802.11 frames, your wireless adapter must operate in monitor mode. It’s essential to understand that promiscuous mode and monitor mode are not the same. Promiscuous mode allows you to capture all frames on a network to which you’re connected, whereas monitor mode lets you capture all frames from all networks on a channel without needing a network connection. (Carpenter et al., 2021, p69-71)
Selecting the right tools for protocol analysis
When performing protocol analysis, the first step is selecting the correct software and hardware. Many options are available, and the choice largely depends on three key factors:
- The operating system you’re using
- The protocol analysis software and drivers
- The required hardware (Wi-Fi adapter)
You should start by identifying software options compatible with your OS and then check the supported Wi-Fi adapters. Some tools tie their licenses to a computer, while others link them to the adapter itself. The latter option provides flexibility as multiple engineers can share the tool—though only one at a time.
Options for capturing wireless traffic
There are three basic options for capturing wireless traffic
- Mobile capturing – portable devices like laptops, phones, handheld tools
- Infrastructure or AP-based capturing – APs or controller
- Distributed overlay capturing – a network of APs or sensors reporting to a management platform
In most enterprise environments, a combination of these methods is used. AP-based captures have some limitations, such as the inability to see what clients see. Additionally, capturing packets can take the AP’s radio offline, preventing it from servicing clients. (Carpenter et al., 2021, p69-71)
Some APs use time-slicing, where they alternate between capturing and servicing. While this reduces client disruption, it may still miss certain transmissions. The best solution for this is to use a tri-radio AP with one dedicated scanning radio, often referred to as a sensor. The other two radios continue servicing clients, ensuring uninterrupted service while the third captures raw data.
The most commonly used method for doing protocol analysis is a laptop with analysis software, wireless cards, and drivers installed. Here we go back to the 3 criteria: Operating system, Software/drivers, and the required hardware.
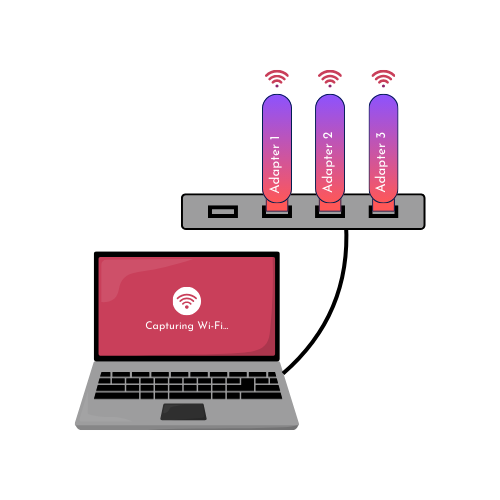
A typical setup would involve using a Windows laptop running protocol analysis software such as Wireshark with the Npcap driver. typical built-in Wi-Fi cards in Windows laptops (Intel) do not support monitor mode, so you’ll need a Wi-Fi USB adapter (or a USB hub with multiple USB Wi-Fi adapters) for capturing 802.11 traffic. In contrast, MacBooks have built-in Wi-Fi cards that support monitor mode, reducing the need for USB adapters unless you need to capture multiple channels, such as in roaming scenarios.
Using infrastructure-based capture solutions, preferably dedicated sensor radios, has the main benefit of not having to travel on-site. You can easily perform the capture and analysis from the comfort of your desk. You might as well grab a nice cup of coffee. The downside is that you cannot perform client-side tests and have to trust the customer to do these tests for reproducing the issue. It’s very difficult to check for the so-called “layer 8” issues. I’d say that communication is key using this method, and you should perform your troubleshooting according to the CWNP-defined steps (see CWAP Chapter 1).
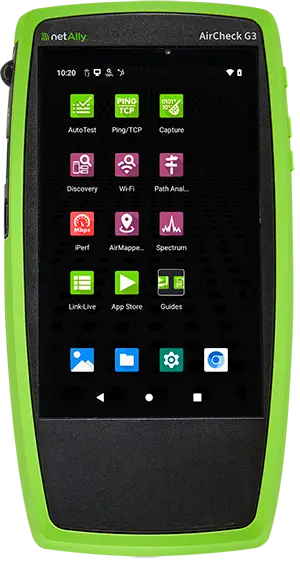
Many handheld specialty devices are developed for the main purpose of capturing (wireless) traffic. The main benefit is that you don’t need other hardware or drivers besides the tool itself. It is also very mobile and in most cases lighter than a laptop. A well-known example of this is NetAlly’s Aircheck G3.
Selecting the right capture location and timing
Selecting the right capture location is also important. If only one client has an issue, you might want to capture near that client. If multiple clients have issues, you may want to capture closer to the AP(s). Or you might perform captures on both locations and compare them.
Another aspect is time. Some problems occur occasionally, others re-occur at specific time intervals, and other problems can be recreated – a common example is an authentication failure. Peak times at the start of the workday, lunchtime, or end of the workday are usual periods to capture – as user density might fluctuate on APs at the entrance or in the cafeteria.
Single vs. multi-channel captures
Understanding the different techniques for wireless captures can greatly improve your troubleshooting process. Whether using single-channel or multi-channel captures, both approaches offer valuable perspectives on network behavior.
Single-channel captures: capture all traffic on a dedicated channel. This method is mainly used to troubleshoot particular issues where you need to capture all traffic from specific devices (whom are connected on that specific channel).
Scanning multiple channels: capture each channel on a separate time window. You will miss traffic on channel A if you are capturing on channel B. However, over time you’ll get a good overview of the network. This method is mainly used in survey work. Some software programs allow you to define the time each channel should be scanned before moving on to the next channel – this is more known as the dwell time. (Carpenter et al., 2021, p127-128)
Single-channel captures are ideal for isolating issues tied to specific devices connected to that channel and location. This approach ensures that you capture every interaction and transaction relevant to the device in question, providing clarity in troubleshooting.
On the other hand, multi-channel captures allow for retrieving data across various channels over time, offering a broader overview of network activity. While this method helps identify general performance trends and issues, it comes with the caveat of potentially missing critical traffic occurring on channels not currently being monitored.
In roaming scenarios, you want to capture multiple channels and be sure to capture all traffic, so you can see the hand-offs between access points. If you’re using a single adapter to scan multiple channels, you will not see all frame exchanges. A solution for this is to use multiple adapters to capture on dedicated (single) channels. For 2.4GHz you might just use 3 adapters on Channels 1,6 and 11. For 5GHz, you may want to gather information on which channels are used on the APs that reside on the roaming/walking path.
Multiple factors can impact roaming such as:
- AP Signal strength – indicated as RSSI
- AP Placement – Ensure coverage overlap / secondary signal strength
- Roaming Aggressiveness (client side) – too low means the client is too sticky to bad AP, too high means excessive roaming
- Roaming protocols – 802.11k, v and r
- Load-balancing algorithms – APs may stop responding to association requests
- Minimum basic data rate – too high means the distance to support the higher data rate becomes smaller and thus roams earlier/faster when moving.
- RF interference
Other factors can come into play, but these are the first things you should look at when troubleshooting roaming issues. We’ll dig deeper into analyzing roaming behavior during later chapters of the CWAP study guide.
Key software features for protocol analysis
Now we’ve gone through the hardware, let’s see what we can do in most of the protocol analysis software packages that will make our job way easier.
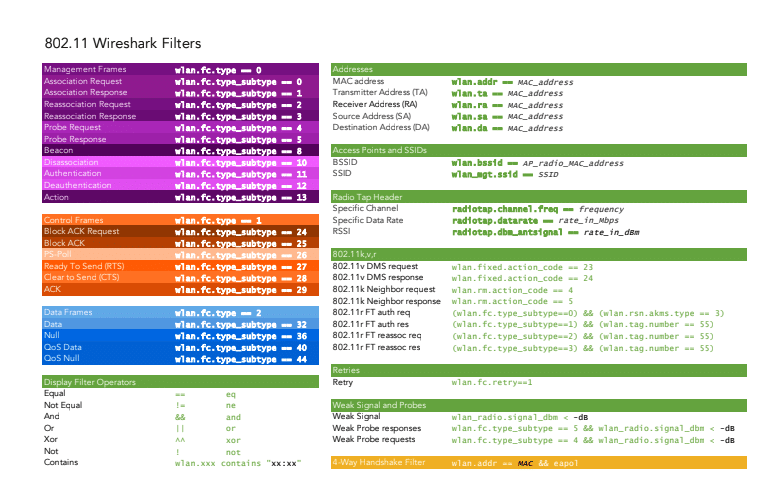
The main and most obvious feature of these programs is display filtering. When performing 802.11 captures in monitor mode, you’re capturing everything your device can pick up. That will probably result in a lot of packets. You can easily filter out a certain device, or (sub)types of frames. Of course, you can use these filters in conjunction with one another. You can for example only look at control frames (layer 2) being sent to or from your smartphone. Along with these display filters, you can configure display columns where you can include or exclude the information you need.
Another feature that is widely used is colorization. This one is also quite obvious, as you can assign different colors to different types of frames. When using this feature, it is easy to identify the different types of frames. When you know what the usual frame exchange looks like, you can see at a glance what’s missing in the frame exchange of the capture you’re analysing. There are some colorization profiles out there that you can import into your favorite tool – I invite you to share which one(s) you’re using.
If you’re capturing for a specific SSID that uses a PSK, you can decrypt the traffic and see all data flows as if you’re capturing on a wired network. If you’re sending unencrypted traffic like HTTP over a PSK SSID, the analyst could see your plain data. To be able to decrypt the traffic, you’ll need to capture the 4-way handshake (communication between AP and client to encrypt traffic) and know the PSK. The PSK is used in the 4-way handshake to encrypt the traffic, so if you know the PSK, you can reverse engineer the encryption process. The easiest way to guarantee a 4-way handshake capture is to disconnect a device and let it reconnect. Be aware – check with your customer, or even your own employer if used in the office, if you’re allowed to perform decryption. You’ll gain access to information that would fall under privacy regulations. More on this topic in later blog posts – probably during my CWSP studies.
When selecting Wi-Fi protocol analysis software, the feature set can vary significantly from tool to tool. Some programs offer advanced views like expert analysis modes, which automatically highlight potential issues in captured frames, while others include peer maps that visualize device relationships within the network. You might want to explore different tools to see which one you’ll like the most.
One last thing to pay attention to is that performing packet captures can demand a lot of resources, and files can become big very quickly. You could limit the maximum file size, use capture filters (similar to display filters, but only captures what the filter is set to), buffer size,… With packet slicing, you could limit the packet size. As frame headers have specific sizes, you could capture just the frame headers and “discard” the data payload, as most of the time we’re just interested in layer 1 and layer 2. CWNP’s recommendation is to set this option to 400 bytes, which allows you to still capture large beacon frames and other larger management/control frames entirely. (Carpenter et al., 2021, p123-124)
Chapter 2 of CWAP-404’s study guide is all about how and when you can perform wireless captures and protocol analysis. I am very interested in hearing what tools you are using and what your setup looks like for capturing and troubleshooting wireless networks.
Please share them with me through the comments section below or on social media. I’d love to learn about all the tools used in the industry so I can assemble a toolkit myself instead of borrowing other people’s tools.
Thank you for reading, I hope you enjoyed it and I hope you’ll keep following me along my journey. I appreciate your feedback on how I can improve or if I did/wrote something that’s not right.
Source(s):
Carpenter, T., et al. (2021). CWAP-404: Certified Wireless Analysis Professional Study Guide (2nd ed.). Durham NC, USA: Certitrek Publishing
Netally.com. (2022) Aircheck G3. Retrieved September 26, 2024, from https://www.netally.com/products/aircheckg3/
Wlanprofessionals.com. (n.d.) 802.11 Wireshark Filters. Retrieved September 26, 2024, from https://wlanprofessionals.com/802-11-wireshark-filters-chart/
K’leer nog wat bij op m’n ouwe dag 😉.